Thursday, September 29, 2011

Doctor's Office - In Progress.


http://www.ucaoa.org/recognition_certification_criteria.php

All facilities, regardless of staffing model, must meet or exceed all of the minimum criteria below.
1. Facility must accept and advertise that walk-in patients of all ages are accepted for a broad spectrum of illness, injury and disease during all hours the facility is open to see patients.
Pediatric specialty centers are exempt from above age requirement IF pediatric-only specialization is included in the name of the facility.
2. The following must be available during all posted hours of operation for the facility:
X-ray on site
Phlebotomy services on site
Licensed provider on site with the appropriate state licenses and resources to:
obtain and read an EKG and x-ray on site
administer PO, IM & IV medication/fluids on site
perform minor procedures (ex. sutures, cyst removal, incision & drainage, splinting) on site
The following equipment, and staff trained in its use:
automated external defibrillator (AED) (or more advanced device)
oxygen, ambu-bag/oral airway
drug cart stocked appropriately for patient population (as determined by the facility)
working phone to dial 911
At least two exam rooms, separate waiting area and restricted access patient restrooms
3. Minimum hours of operation (must meet all three criteria)
7 days/week (not including national holidays)
4+ hours each day
3000 hours per year
Alternatively, special circumstances will be considered for a facility if all of the following are met (see application):
Facility is part of a multi-center system
Facility is open 5+ days/week (not including national holidays)
Another facility that is part of the same system meets standard minimum hours of operation criteria [Criteria 3] AND is less than or equal to five miles away
4. Facility must have a licensed physician designated as Medical Director for the facility who is responsible for overall clinical quality.
5. Facility must provide medical care and perform business activities in an ethical manner.


http://www.absolutemed.com/
We will expand that office every year by starting family medicine / adult services then start diagnostic lab radiology services etc

Tuesday, August 23, 2011

Home Ideas...

Construction
Elevator thumb scanner...
Pent House entry
Living room speakers.

Bakery (PENT HOUSE EATERY)!
http://coffeeculture.us/usa/index.html


Rotating lights - on top of the building to make instant selection. --> Lowes carpet stand to choose and cut.

Monday, August 15, 2011

Adding AJAX ToolKit for Visual Studio 2010 ToolBox.

We are planning to write a project in AJAX, thought i will share this to people who want to add AJAX toolkit to their visual studio as it doesn't come by default.

Firstly, you need to download AJAX Toolkit .NET 4 from http://ajaxcontroltoolkit.codeplex.com/releases/view/43475#DownloadId=116534

2. Once download is complete, extract AjaxControlToolkit on your computer


3. Now, Open Visual Studio 2010, Right Click anywhere on the toolbox and choose Add Tab. I have created AJAX ToolKit - Feel free to create your own.


4. Now inside the empty space of that newly created tab, right click again and click on Choose Items, then a popup will open with all references. Click on browse at the bottom, and navigate to the folder where you downloaded and extracted the AJAX tool kit files.  Select the AJAXControlToolKit.dll

5.Now you will see different types of controls are pre-selected and highlighted. Don't worry about the controls that are already selected - they wont be added again as they are already present under different tabs. P.S Don't deselect either!

6. Now you will see a little animation of all the controls being added to the toolbox, drag and drop any of those and enjoy using them.!!!!!

One last thing, if you need help on how to use these or get a demo of these controls. Here is the link...
http://www.asp.net/ajaxlibrary/AjaxControlToolkitSampleSite/

Good luck! Feel free to ask if you have any questions!

Monday, August 8, 2011

Copper Triangle - 80 Miles Bike Ride Aug 06, 2011

Finally left work aroun 2:45PM on Aug 5 to head to Copper mountain, CO. Long drive from Cheyenne, took us about 4 hours due to two accidents on the way on I-70. We decided to take a break and let the traffic congestion clear. Meantime we checked and make sure the mini mazda hitch is okay...


Never seen a mazda with a hitch? Here you go...

Best use of the hatchback :)...

 Stress test has been completed, off we go.

Its about 5:15 I started from the hotel, but forgot my tags for the bike... bummer :(... So had to call silpa to the outside parking lot and wore my tags for bike and helmet and started around 5:40 finally without any hurdles...

Rohit and mike crossed me around 7th mile from the beginning of the race. While i slowly reached Fremont pass around 7:10AM. Overall not a bad grade at all. max grade is 9.5% at one point ... other than that it's a constant uphill with few flats... easier than we thought.
 After Fremont pass, this was the best part. all down hill for about 25 miles with 3-4 miles of climb. That's when i reached tennesse pass around 8:50AM.  This was second aid station where we had to detour into the aid station way inside... Spent 15 minutes eating bagels, cookies and bananas :)...

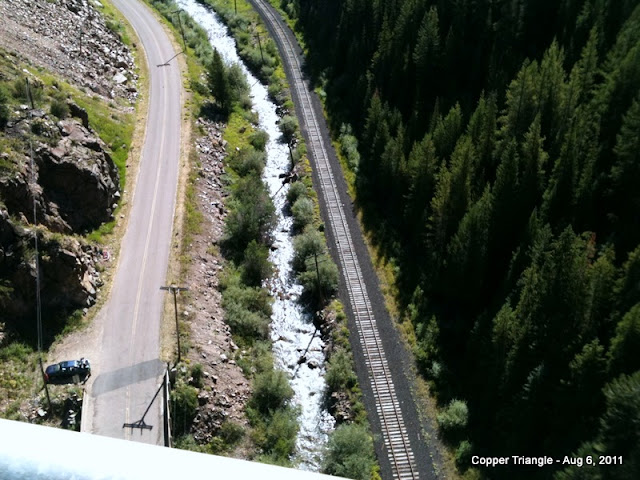
After Tenesse pass, there was one strech of 2 miles or so.... The below is a snapshot of how high the bridge was that i am standing on. Atleast 1000ft high.
 Third aid station was approximately 8 miles from the second one.. and got some Clif shots there .. didin't spend much time there. Reached the fourth aid station (65 miles) around 11:45, where i took a half hour break just to relax and enjoy some snacks and bars.

This is the final strech of 8.5 miles of climb and gains about 2300ft of elevation... Right after the bridge i had to get down and walk as the grade was atleast 17% for about 0.1 mile... not long , but dead steep.

 Finally, made it to vail pass around 1:40.. almost tired but realzied that all uphill climb is done.... which is good news... Didn't even bother to go into the 5th aid station

 My special number for the event :)... Not 555 it's 2555

 Total mileage for the day... 80.46 miles in 7 hours 11 mins, started from the beginning. But noticed lot of people starting from the outside parking lot... sucks! didn't know that.

Here i am at the finish line :)..


My Bike caddy!
 Paying tributes...


Because of him (Rohit) this whole thing of biking happened... Dedication, Determination, ... you name it, he has it. Proud to Be Indian....

Here is the Indo-Nepali peace treaty agreement in USA :)...


Over and out.... Waiting to do something crazy!!!!

Thursday, August 4, 2011

Speakers layout for a large room.


Placement of speakers in a room is critical for best output and quality. Here is a sample layout, and we are using this in our auditorium in India. BTW, i designed this layout, comments are Welcome!
Room specifications: 50FT X 35FT


Our office layout in VJA.

Thursday, July 7, 2011

Hiked Missouri mountain..

Date climbed.: Jun 25th, 2011
Summit: Missouri Mountain (14,067 Ft)

Start Time: 7:40AM
Finish Time: 7:20PM

 Me, silpa and rohit's family drove to campgrounds near the trailhead on friday night, long drive took 4 hours + from Cheyenne, WY. We stopped at Ft Collins where Anu and his wife joined with set of snow shoes (The whole hike was possible only because of having snow shoes). Around 7ish, we set up our tents and couple beers and BBQ made that night delightful...


Group photo at the trail head... we arrived after tearing tents down and morning breakfast at around 7:15AM and took some photos at the trailhead and started hike at 7:40AM.

Until the treeline, everything was very nice and sunny... it's after the tree line it all started as soon as we took the trail towards missouri (to your right) - Left is belford and oxford. The snow was all over the mountain even at 11,000 feet.  This is where we have used our snow shoes... GOOD USE


At around 11,400Ft after the gulch we met a skiier who took our group photo, he was coming down from the top of the mountain skiing.


Rohit's pace was well beyond our's pace of hiking, so he became the photographer while enjoying the views.. BTW, it was me on the knees taking a break.

Rocky the dog is the leader of the group showing the way, as the snow was so slushy, he knew where to direct us.


After the snow strech is done, here comes the worst part of the hike, class 3 exposure and on top of it, loose rock and chips which were not at all helping to get a grip. We somehow managed to get to the top of this scary hill. All the way at the bottom is me trying to catch up...
 A close up picture of how bad it was... Basically the trail was covered in snow and we had to take this short cut to climb up this hill inorder to avoid any deep snow...
 After that hill from around 13,700ft, it was all pretty flat down and little up to the summit, the background mountains were awesome to view with real eyes... i would never get to see such a scenery in my life again i guess.. (Because this is one of the crazy, which i told myself not to do again if the snow conditions are like this).

P.S: In between this straight walk to the summit, there is one 50 mts strech where it's really steep on the right side... while going up wasn't a problem.. coming down it was scary.

 The rest of the group waiting for me at the summit, little creative photography from Anu or Rohit.   Finally our group click on top of the summit.


Climbing up was done, now even thinking about going down was freaking all of us.. It made me more scared as an experienced hiker told he has not thought about how to get down yet... :(.  The best part of the hike is slidingdown the mountain where there was snow... We save almost an hour of pain in hiking down and covered atleast a mile hike by sliding down this snow mountian..


 It was me in the background waiting for the rest of group to come down, i took the initiative to slide down first (well got frustrated) while our group was hesitant to slide....


Due to the sun, the snow melted and it got into our shoes, we stopped try Anu';s creative idea of wearining plastic socks instead of regular socks... Totally did not work :)... But atleast we tried..


Be safe & careful out there, i am not very happy while i was hiking, but after i finished it.... it was good. I am deeply saddened when i found out that 2 hikers lost their life hiking this mountain on the very before day and it took them a week to findout their dead bodies.. I took the time to post this blog for those who are planning to hike this mountain in this conditions...

This post is dedicated to them and hope their souls rest in peace. [News Link About the Hikers]

Thursday, June 2, 2011

Pressure Treated Lumber Vs Cedar for Raised Garden Beds

     
      CCA lumber contains chromium, copper, and arsenic. Chromium isn’t that toxic and only if we inhale it. Copper isn’t toxic to mammals, and in fact it is used in some skin creams and whatnot. Arsenic is the bad one, a known carcinogen, something to be avoided. Did you know the Romans used to use it as makeup? But people didn’t live long back then anyways.
The truth is arsenic is everywhere, it naturally occurs in soil and water and we eat small amounts of it everyday. The type in CCA wood (inorganic arsenic) is more toxic than the natural types, but just for reference, it is already in the food you grow.

       According to this article, which is an excellent source. Studies have been done showing most leaching only occurs during the first rainy season, and that it doesn’t leach more than a few inches from the wood. Then, most plants do not take it up from the soil, the ones that do in only small amounts, and the arsenic is stored in the parts we do not eat. For instance carrots grown in a control bed had 0.05 parts per million arsenic, those in a bed with CCA lumber had 0.11 parts per million, a doubling, but still a very small amount, and carrots were one of the worst (root vegetables in general were the worst since that is where the plants store arsenic).


            So, is CCA lumber safe? Well, you can leave it out for one year letting the initial leaching get over. Then you can build your beds and line it with plastic sheeting or roofing fabric or some other membrane to stop leaching, and you can not plant root vegetables in it or near the sides of it where the leaching take place.
All told, by looking at the science, I do not think anyone needs to worry about growing vegetables in CCA lumber beds. Sure, you could use cedar, and pay 8x the price (if you can even find cedar in a 2×10 or 2×12 which is my preferred size), but CCA would be fine.


            Should you go out and buy CCA pressure treated lumber to build your raised beds? Well no, you can’t. You see, despite the tiny safety risk, CCA pressure treated lumber was banned for consumer use by the EPA in 2003. Any pressure treated lumber manufactured for consumer use after that date has no arsenic in it. The ban all told was a better safe than sorry issue grown out of kids touching/playing on/eating off of/ CCA playground equipment, not garden contamination, but nevertheless, for the last 5 years pressure treated lumber has not contained arsenic.


            So, for those worrying about it, don’t. Save yourself a few hundred dollars and get pressure treated lumber for your raised bed or other garden projects. It is cheaper than cedar, and worry free. Even if it still contained arsenic it’d be pretty safe, but it doesn’t even have that small risk anymore.


Reference: gardeningblog.net /3.bp.blogspot.com